Know the four tabs
VerbaCue opens the camera-side panel briefly on first launch. If it closes, press ⌥⌘O or choose Open VerbaCuefrom its menu-bar item. Closing the panel stops prompting and Assist capture; it does not leave the microphone running unseen.
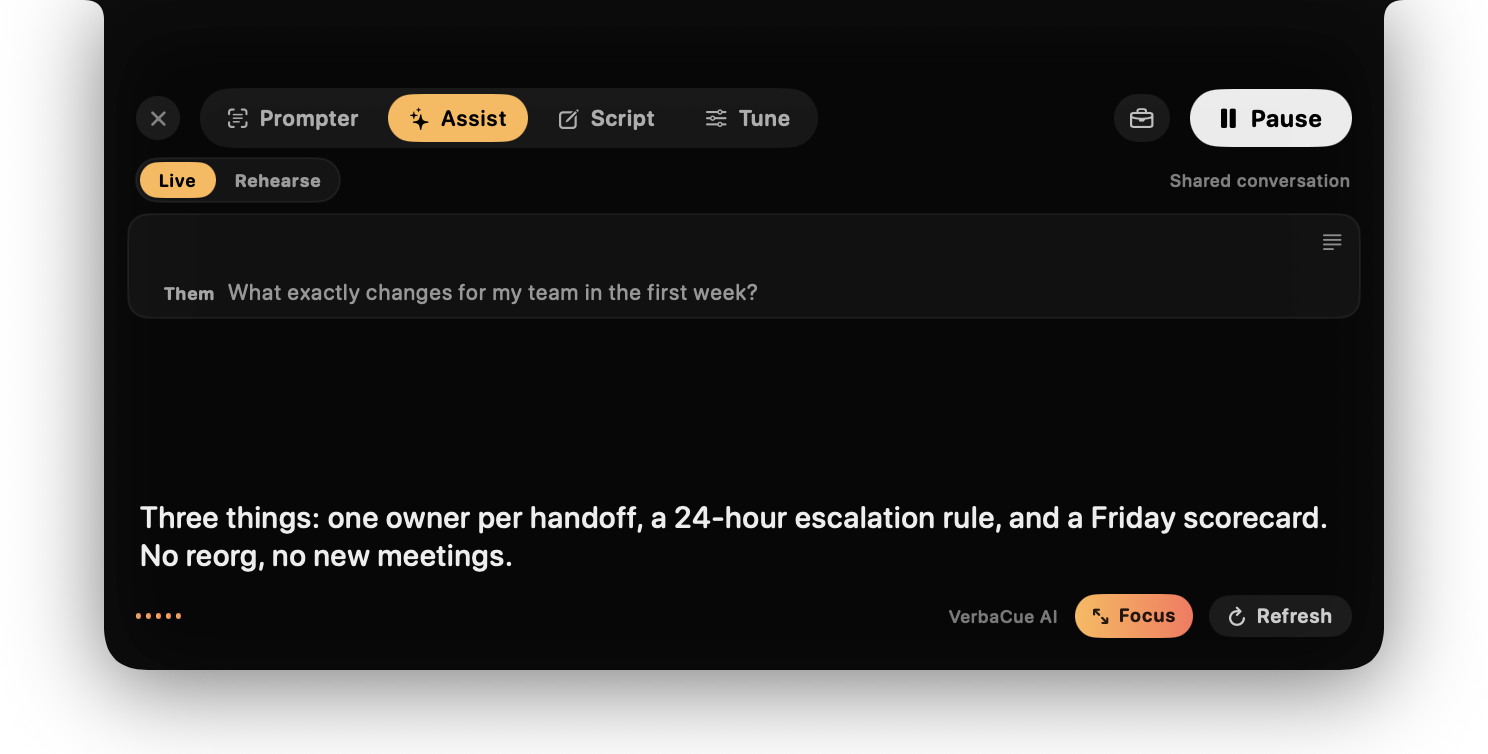
Use the four pills along the panel's top edge:
- Prompter
- Read the current script and start or stop voice-following presentation.
- Assist
- Rehearse fictional questions or listen during a live conversation and request short reply cues.
- Script
- Write or paste teleprompter text, load the sample, review word count and estimated speaking time, or clear and undo.
- Tune
- Adjust panel size, text, speed, speech recognition, Assist input, Auto-suggest, your General profile, license, and shortcuts.
Use the teleprompter
- Open Script, then write or paste the words you want to deliver. Use Load sample to learn with harmless text.
- Open Prompter. Choose Voice sync to follow locally recognized speech or Classic for continuous movement at the configured speed, then choose Start.
- In Voice sync, speak naturally: VerbaCue can wait when you pause and recover after a small improvisation. It requests microphone access when local recognition needs it.
- Hover over the prompt to pause movement. Use the mouse wheel or keyboard shortcuts when you want manual control.
- Choose Stop when you finish. Adjust text size, panel width, height, opacity, speed, language, and microphone gate under Tune.
Scripts and raw microphone audio stay on your Mac. Internet is not required for the Free teleprompter itself.
Run your first Assist rehearsal
- Open Assist and select Rehearse.
- Choose Load 3-min sample. This only fills the local question field; it does not start capture, contact the service, or start the trial.
- Choose Start rehearsal, read the managed-data confirmation, and continue only when you understand it. Rehearse needs Screen Recording permission so it can capture its own spoken questions. On first Assist use, continuing also starts the 7-day no-card trial.
- VerbaCue speaks each fictional question. With Auto-suggest off, choose Suggest after the question and before you answer.
- Judge whether the cue is useful, answer out loud, then continue to the next question. Rehearse again with your own non-sensitive questions when ready.
Rehearse exercises the same local capture and cue path without joining a meeting or using customer material.
Use Assist in a live conversation
- Under Tune → Assist — live suggestions, turn on Hear the other side if you want computer audio labeled as Them and your microphone labeled as You. Screen Recording permission is required for that capture path.
- Optionally choose one running call or browser application as the audio source so unrelated notifications and media stay out of the transcript.
- Open Assist, select Live, then choose Listen. On first Assist use, review and accept the same managed-data confirmation before capture begins.
- After the other person finishes a question, choose Suggest or press ⌥⌘S. Ask before you begin answering: your own new speech can replace the fresh Them turn that a manual suggestion needs.
- Use Focus to enlarge a cue or Refresh for a new answer. Choose Pause to stop listening while keeping the local conversation available to resume.
Auto-suggest is optional. When enabled under Tune, VerbaCue may request a cue after the other side fully stops talking; when disabled, nothing is requested until you choose Suggest.
Add only the context that helps
A useful cue can include more than the latest question, but every extra field is optional:
- General profile: reusable facts, objectives, or communication preferences under Tune.
- Call Brief: the current conversation’s title, participants, goal, facts, and constraints, opened from the briefcase button in Assist.
- Documents: up to 10 supported local documents in the active Call Brief. VerbaCue extracts text locally and selects only relevant bounded excerpts for a cue.
A Call Brief can hold a call title, counterpart, goal, desired outcome, key facts and constraints, additional notes, plus PDF, DOCX, RTF, TXT, or Markdown documents. Saved briefs can be reused; switching context asks before clearing an existing conversation.
Keep this material short, current, and appropriate for the call. Starting a New Conversation clears the local conversation and keeps it out of future cue requests.
Keyboard shortcuts
- ⌥⌘P
- Start or stop prompting
- ⌥⌘A
- Pause or resume Assist listening
- ⌥⌘S
- Suggest a reply now
- ⌥⌘O
- Open or close the panel
- ⌥⌘↑ / ⌥⌘↓
- Move through the script
- ⌥⌘= / ⌥⌘−
- Increase or decrease scroll speed
These shortcuts are also listed inside Tune → Shortcuts.
Understand the privacy boundary
- Stays on this Mac: raw audio, speech recognition, scripts, source documents, filenames, and file paths.
- Sent for an Assist cue when managed AI is enabled: bounded recent conversation text plus any optional General profile, active Call Brief, and relevant excerpts selected locally from documents you chose.
- Not stored as a transcript: VerbaCue does not keep call recordings or conversation transcripts on its service.
Exclude from supported captures is on by default under Tune. Legacy on-device recognition may also prompt for the macOS Speech Recognition permission.
Capture exclusion is not universal invisibility. Before a high-stakes call, test the exact meeting or recording app, the exact window or display sharing mode, and the exact monitor you will use. Stop sharing if the panel appears.
Trial, Pro, and billing
The Free teleprompter remains available without a subscription. Your first Assist use starts a 7-day no-card trial with 30 total cues, capped at 10 per day and 3 per minute.
Pro includes 300 cues per UTC calendar month, up to 60 per day and 10 per minute, across up to 3 Macs. Limits are shared by the same license, not multiplied per device.
To activate, open Tune → Assist — live suggestions, paste the license from your Lemon receipt under Activate a license, and choose Activate. Never send the license key to support.
Troubleshooting
- VerbaCue cannot hear you
- Enable VerbaCue in System Settings → Privacy & Security → Microphone, choose the intended input in System Settings → Sound → Input, then try again.
- The other speaker is missing
- Enable Screen Recording for VerbaCue, restart the app after changing permission, turn on Hear the other side, and choose the correct running call app.
- Suggest is unavailable
- Start or resume Listen, wait for a fresh Them turn, check connectivity, and review the in-app minute, daily, or monthly allowance.
- The panel appears in a share
- Stop sharing immediately and change to a tested supported window-sharing path. Do not assume all capture tools behave alike.
- Activation is pending
- Wait for the shown retry time, then use Retry activation safely. Send support the displayed reference—not the license key—if it remains pending.